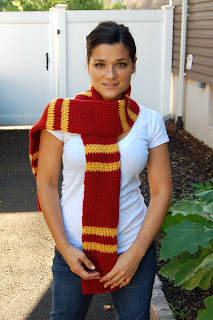
New Scoodie Pattern up on Etsy!!
https://www.etsy.com/listing/39198311/crochet-pattern-scarf-hoodie-pattern?ref=v1_other_1Friday, December 17, 2010
Tuesday, October 5, 2010
New Mily Cowl
Friday, August 27, 2010
Harry Potter House Scarves
Ask the sorting hat what house you're in...
Slytherin
A-Green
B-Gray
Ravenclaw
A-Blue
B-Silver/Gold
(depending on if you’re following the book or movie)
Hufflepuff
A- Yellow
B- Black
Gryffindor
A-Red
B-Yellow
I am not an expert on tunisian crochet, so here are some excellent resources for the tunisian knit stitch.
http://www.nexstitch.com/v_tks.html (also shows basic return row)
http://www.youtube.com/watch?v=K_Au16WDHVE
http://www.ehow.com/how_4773982_crochet-tunisian-knit-stitch.html
L Hook
Solid Section:
With A, Ch 14. Working in the tunisian crochet knit stitch (tks), insert hook in 2nd ch from hook, and complete the forward row. Complete a basic return row.
Continue in this pattern with A until section measures 6.5 inches long finishing with a forward row.
Color Changing Section:
Pick up B and complete return row.
Row 1 Forward: Pull up stitches to the left.
Row 1 Return: Yarn over to the right.
Row 2 Forward: Pull up stitches to the left.
Row 2 Return: Yarn over to the right.
Row 3 Forward: Pull up stitches to the left.
Row 3 Return: Drop B and pick up A
Repeat Color changing section with A and then again with B
Change to A and repeat solid section (measures 6.5 inches)
Repeat color changing section again.
Continue in this pattern until you have the desired scarf length of your choice!
Labels:
Free Patterns,
gryffindor,
harry potter,
tunisian crochet
Thursday, August 12, 2010
New Crafts
I'm trying my hand at pacifier holders. I know there are a few tutorials out there, anyone have a good one? I couldn't get past the concept that I HAD to use a snap setter. A good old fashion hammer worked just fine for me. What do you recommend for the clothing clasp part?
If you're interested in a tutorial, let me know and I'll try to whip this one up.
Tuesday, July 27, 2010
Baby Cocoon Tutorial
Lately, I have been benefiting from many fabulous crafty tutorials. I figured I'd give back and share my crochet baby cocoon tutorial. These cocoons/pea pods, whatever you call it are very popular photography props for new born photographers, and a great shower gift for funky moms who want a unique photo of their newborn. My talented friend Kristen captured this photo of her baby Junah in one of my cocoons.
Materials:
K Hook
Homespun - Earth
The cocoon is worked in one long oval, starting with a chain. The rounds are worked continuously, without joining. You increase (3dc in one st) one at each end as you work around the piece. You increase in the middle increase dc stitch of the previous row. You can mark the middle stitch or just look for it when you get to that point. You can also just do the increase at any point on the end. Homespun is very forgiving :)
- Ch 24 (Just over 10 inches)
- Dc in 3rd ch from hook and in each chain to end.
- Dc 3 additional dc in the last chain. (you may want to mark the middle stitch, this is where you will increase again)
- Continue down the other side of the chain, and dc in the opposite side of the chain in each stitch.
- When you reach the end, 3 dc in the space of the turning chain, (if you choose, mark this st) and continue down the opposite side again, dc in each dc.
- When you reach the 3 dc increase, 3 dc increase in the middle stitch of previous row, and continue to dc down the side.Publish Post
- Continue in this pattern until you have about three rows of increases, or until the piece measures almost 14 inches long. (without pulling) Now, continue to dc around, not increasing at the ends. Continue to dc around, for approximately 6 more rows or until piece measures 6.5 inches high.
- With a little tighter tension, sc one row around the top. Sc decrease 2 together, two times in this row. Make the decreases one on each side equally spaced from the ends. Join with sl st in top of sc. Knot to fasten off and weave in ends.
Following this size, it fit an average size newborn. You want the baby to be kinda tucked up inside and it's cute when little toes or fingers poke through. I'd be happy to answer any questions :)
If you like and use my free patterns please thank me by subscribing to my youtube channel and following my blog.
http://www.youtube.com/user/CarmenBeeCrochet?feature=mhee
http://carmenbeeblog.blogspot.com/
*Note: This item is meant only for a photography prop, babies are not meant to be left unattended in cocoon, nor is it to be used for any other purpose.
This pattern is intended for your personal use. This is my personal pattern, permission is not given to sell the pattern, or the items you make. Please credit my blog in re-posting this pattern. Thank you and enjoy!
Labels:
crochet,
Free Patterns,
photography,
prop,
tutorial
Wednesday, May 5, 2010
Baby Hoodie Vest
My newest design is now available!
http://www.etsy.com/listing/46248872/baby-hoodie-vest-crochet-pattern
Thank you to all the pattern testers and to Kristen and Jill for their awesome photos.
Tuesday, April 13, 2010
9 to 5 Shrug Pattern
Tuesday, January 5, 2010
Subscribe to:
Posts (Atom)